Your cart is currently empty!
How to create a WooCommerce discontinued product
In this guide, I’ll show you how to discontinue a product from your WooCommerce store.
Last Updated
Written By
Do you need to discontinue a WooCommerce product from your store? If so, I’m sure that by now you’ve realized that WooCommerce doesn’t have a built in way to do this. The good news however is that there are plugins which allow you to create a WooCommerce discontinued product.
In this step by step guide, we’re going to show you exactly how to add the functionality to WooCommerce so that you can start discontinuing products from your store today.
Step 1: Decide on how you want your product to be discontinued
Before we actually install a plugin, there is a chance you may not even need a plugin at all. If you want to hide the product completely from the front end of your website so that no one will ever be able to find it again, then you actually just need to set your WooCommerce product to private.
However, if you actually want the product to be found on your site but not bought by a visitor, then you need to install a plugin to discontinue the product. There are a number of reasons why you would want to discontinue a product instead of hide it:
- Retain the search engine rankings for the product page. If you rank well in the search engines for specific keywords on one of your products, you would not want to lose those rankings by removing the product.
- Allow customers to pre-order the product. You may be anticipating that you’ll be receiving stock of the product at some point in the future and want to still take orders for the product.
- Allow customers to add the product to a wish list. Similar to the above, except you don’t take an order, you may want to just allow customers to add the product to a wish list and gather insights on interest in the product.
If you decide to discontinue the product, rather than hide it, then keep on reading. Otherwise, you should have everything you need already to hide products using the previously linked guide.
Step 2: Install a WooCommerce discontinued product plugin if needed
Ok, so we’ve decided to discontinue. Let’s install a plugin to get this functionality added. WP Geeks is in the process of building out our own WooCommerce discontinued products plugin, but until that is ready, we recommend that you use this plugin (WooCommerce Discontinued Product) to discontinue products.
Download and install the plugin and then move to step 3.
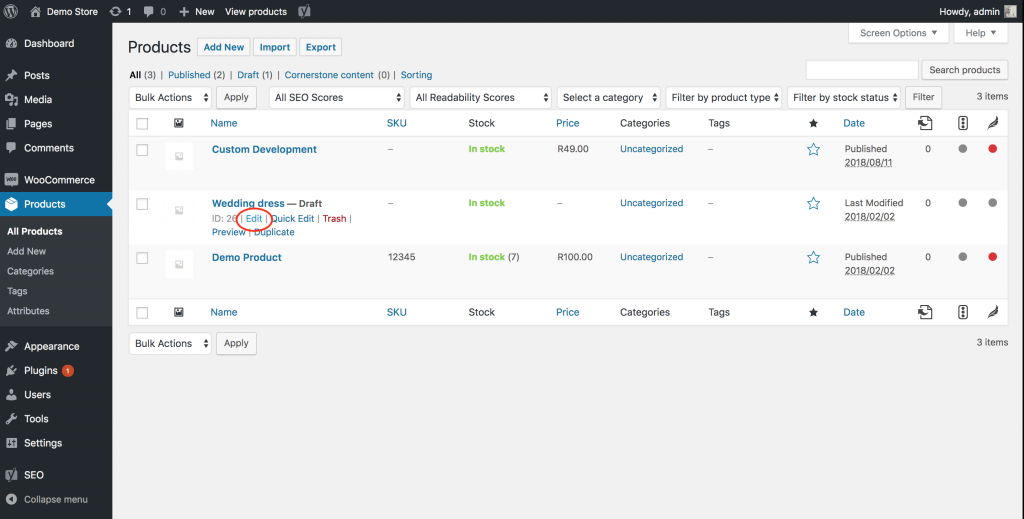
Step 3: Find the product to be discontinued
Now that you’re ready to discontinue a product, you need to find it. Go to “Products” on the right hand side menu and select the product from the list. You can also select the “Edit” button when hovering over the product. See the screenshot below for a reference of what to look for.
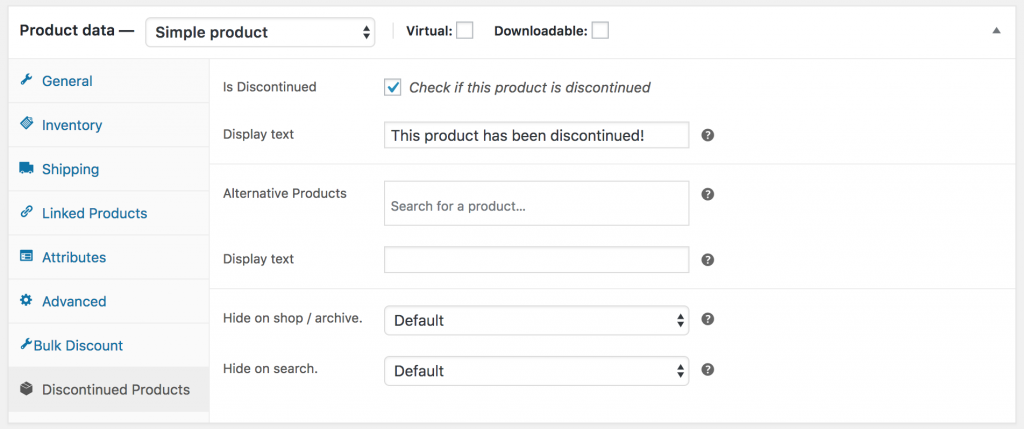
Step 4: Discontinue the product in the settings
Lastly, we need to actually discontinue the product itself. From the product page, scroll down to the “Product data” section. Then click “Discontinued Products” on the left hand side. From this tab, you’re able to set the product as discontinued. You can also adjust whether or not to show the product in the front end of the site, add a custom message and assign an alternative product.
And that’s it. We hope you found this guide useful. If you need any assistance, send us a message in the comments below and we’ll do our best to help you out!
Tags:
WooCommerce
WooCommerce
Comments
17 responses to “How to create a WooCommerce discontinued product”
Thanks for the information.
1. Have you finished your plugin and where can it be found?
2. When we mark a discontinued product as “Privately Published”, (because we may wish to re-add it later) it still shows in our Google Product Feed and causes errors in Google Merchant Center. How do we keep the listing data for future use but hide it from the feed crawler?Would your plugin help with this? Any information would be greatly appreciated.
Hi Chris,
1. Will be out shortly!
2. For this, you’ll need to check if a filter is available to remove it from the Google Feed. I’ll see if I can add this functionality to our plugin.Cheers!
What about variations? Maybe you have 6x or 3x small shirts that didn’t sell very well but the rest do, so you want to restock the other sizes that do well. I’m very interested in this plug-in!
Hi Kyle,
That’s an interesting use-case and is definitely something we could build in to the plugin. I’ll get that worked on early next week. Plugin should be released next week, I’ll ping you when it’s live.
Cheers,
Matt
Hi, I am posting this on the 23rd of June, 2020. I can find the github plugin, but I can’t find it on WordPress. Is there any update on when the plugin will be released? Thank you.
Hi there!
Yes, we’re aiming for a release this week! 🙂 I’ll let you know via email once the plugin is ready.
Cheers,
Matt
Hi, do you plan to add to the plugin a “Bulk edit” for discontinued products?
Hi Matt,
What is status on this plugin? Has it been released or discontinued?
Thanks,
MartinHi Martin,
The plugin referenced in the guide is available at: https://github.com/twoelevenjay/woocommerce-discontinued-products
Matt
Will this hide products (that has out of stock status) from the Woocommerce > Reports > Stock > Out of stock? I would like to remove discontinued products from this report to better manage out of stock items.
Currently I have a out of stock list with 100s of products. I don’t want to delete the product because they might get a restock. but I want a way to check them off so they don’t appear on this report again.Hi Matthew,
I don’t believe the plugin currently does remove them from reports. We will look to add this to our version of the plugin that we are building.
Thanks,
Matt
Hi,
I’m interested in this plugin. Will you be releasing a final version or a pro version of this plugin soon?
ThanksHi Dani,
Unfortunately at the moment we have a lot on our plates. But we’re looking to prioritise this plugin as it is requested often.
Thanks,
Matt
Hello, is this plugin on wordpress to plugin or do we have to do this directly through github download and upload?
Hi Ryan,
You will need to use the Github download for now.
Thanks,
Matt
Hi Matt,
I tried your plugin version 1.17 from Github, but there are some issues.
Previously I was using the 1.15 version from WordPress.org, that actually works ok.
When on 1.17, it caused 2 issues.
Shop page : Page 2 upwards –> 404 error page
Product Categories : ALL will turn up with zero items, then Discontinued product will appear. (I so happen to chance upon the Discontinued product’s category — Network)If I revert back to your 1.15 version, its working as it should. Products appear in its categories and the Discontinued one will not appear.
So I think something is not right with your 1.17 version. Just a headsup.
I’m sticking to 1.15 version for now though it has not been updated for 2 years as mentioned in WordPress.org.
Hi,
Is this plugin stable with the latest WordPress version (5.8)?
And do you know if it is compatible with the DIVI theme?Stephen
Leave a Reply